sasquatch
works by utilizing the SASPy
python package, similar to packages like sasr
or configSAS. This
means everything we do to connect R and SAS, needs to go through the
translation layer which is SASPy
.
Setting up can be difficult, but this guide is here to help you! Keep
in mind there are many different ways to connect to SAS and different
operating systems will have different steps. The following vignette will
only address connecting to SAS On Demand for Academics (ODA) servers. If
you are looking to utilize other SAS clients, check out the SASPy
configuration documentation. Although it is quite lengthy, it will
provide you with all the necessary steps to connect to any SAS client
from any machine.
Signing up for SAS ODA
SAS ODA is free SAS client for professors, students, and independent learners. Create an account at https://welcome.oda.sas.com/.
Once you have set up your account, log in and note the ODA server (in the picture below United States 2) and your username (under the email in the profile dropdown). We will need these for later.
Installing Python
If you do not already have Python already installed, install Python from the Python Software Foundation website.
Installing Java
If you do not already have Java installed, install Java. Note the path that you install java in.
If you do have Java installed, but do not remember where you installed it, then…
In windows, it is usually installed in
C:\Program Files\Java\jdk{version number}
, but you can
double check by opening up a terminal and typing in:
where java
In mac or linux, it is usually installed in
/usr/bin/java
, but you can double check by opening up a
terminal and typing in:
which java
Note the Java path for later.
Setting up SASPy
Note we are going install the SASPy
package in our
global python install. It’s often a better practice to create a virtual
environment, conda environment, or use one of the many other ways to
isolate package installs. This isn’t necessarily a worry if you only
plan to use SAS and R together.
In windows, open up a command prompt type in:
py -m pip install wheel
py -m pip install SASPy
py -m pip install pandas
py -m site --user-site
In linux or max, open up a terminal and type in:
python3 -m pip install wheel
python3 -m pip install SASPy
python3 -m pip install pandas
python3 -m site --user-site
This will install the required packages for SASPy
and
then print out the path where they were installed. Navigate to this path
and find the SASPy
folder. This is where the
SASPy
package is stored. Create a new file within the SASPy
package called sascfg_personal.py
.
Inside that file paste the the following:
SAS_config_names = ['oda']
oda = {
'java' : '{java path}',
#US Home Region 1
#'iomhost' : ['odaws01-usw2.oda.sas.com','odaws02-usw2.oda.sas.com','odaws03-usw2.oda.sas.com','odaws04-usw2.oda.sas.com'],
#US Home Region 2
#'iomhost' : ['odaws01-usw2-2.oda.sas.com','odaws02-usw2-2.oda.sas.com'],
#European Home Region 1
#'iomhost' : ['odaws01-euw1.oda.sas.com','odaws02-euw1.oda.sas.com'],
#Asia Pacific Home Region 1
#'iomhost' : ['odaws01-apse1.oda.sas.com','odaws02-apse1.oda.sas.com'],
#Asia Pacific Home Region 2
#'iomhost' : ['odaws01-apse1-2.oda.sas.com','odaws02-apse1-2.oda.sas.com'],
'iomport' : 8591,
'encoding' : 'utf-8',
'authkey' : 'oda'
}
Remember back to where java was installed on your computer and
replace {java path}
with the path to your java install.
Note: If your path contains \
replace
them with /
or \\
.
Next, remember which SAS ODA server your account resides in. Remove
the #
for the line after your SAS ODA server.
As an example:
SAS_config_names = ['oda']
oda = {
'java' : '/usr/bin/java',
#US Home Region 1
#'iomhost' : ['odaws01-usw2.oda.sas.com','odaws02-usw2.oda.sas.com','odaws03-usw2.oda.sas.com','odaws04-usw2.oda.sas.com'],
#US Home Region 2
'iomhost' : ['odaws01-usw2-2.oda.sas.com','odaws02-usw2-2.oda.sas.com'],
#European Home Region 1
#'iomhost' : ['odaws01-euw1.oda.sas.com','odaws02-euw1.oda.sas.com'],
#Asia Pacific Home Region 1
#'iomhost' : ['odaws01-apse1.oda.sas.com','odaws02-apse1.oda.sas.com'],
#Asia Pacific Home Region 2
#'iomhost' : ['odaws01-apse1-2.oda.sas.com','odaws02-apse1-2.oda.sas.com'],
'iomport' : 8591,
'encoding' : 'utf-8',
'authkey' : 'oda'
}
We’re almost done! One last thing.
On Windows, create a file named _authinfo
in
C:\Users\{your username}\
.
On Mac or Linux, create a file named .authinfo
in
/home/{your username}/
a.k.a. ~
.
Within this file write the following:
oda user {your SAS ODA username} password {your SAS ODA password}
Substitute the {your SAS ODA username}
with the username
you noted earlier, and {your SAS ODA password}
with your
ODA password. You’re done setting up SASPy
!
Using sasquatch
Now that you have everything set up, you can start using
sasquatch
.
Open up your favorite R IDE and install sasquatch
pak::pkg_install("ryanzomorrodi/sasquatch")
Now you can create SAS quarto code blocks just like any other!
Example:
Interactive use
RStudio
Within RStudio, you should be able to run SAS chunks as you would any
other chunk. However, if you want to be able to view SAS output within
the Viewer instead of beneath the chunk, you can utilize the
sas_run_selected()
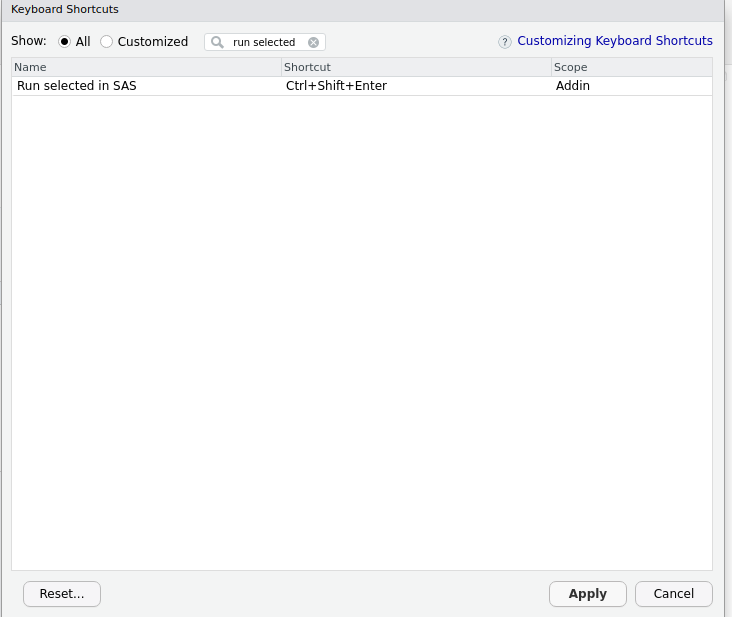
addin. To add a keyboard shortcut for
this addin, open Tools -> Modify Keyboard Shortcuts and search “Run
selected in SAS”, type in the box under Shortcut to set the keyboard
shortcut to your liking and click Apply.
Positron
Within Positron, you will not be able to run SAS chunks as you would
R or Python chunks. However, just as in RStudio, you can create a
keyboard shortcut which will allow you to view SAS output within the
Plots pane. Open up the command palette with ctrl+shift+p
or command+shift+p
and search “Preferences: Open Keyboard
Shortcuts (JSON)”. Add the following to your shortcuts.
{
"key": "ctrl+shift+enter",
"command": "workbench.action.executeCode.console",
"when": "editorTextFocus",
"args": {
"langId": "r",
"code": "sasquatch::sas_run_selected()",
"focus": true
}
}
Edit the key
argument to set your preferred
shortcut.